
Introduction
An Analog keypad is a type of keypad or button board connected to an analog input on an Arduino microcontroller. One of its advantages is its ability to detect many buttons using only one analog port so that it can save on port usage.
For example, in the ATmega328p PWM card project, I use three digital ports and later I will replace them with these so that I can use the ports for other purposes.
How it works:
The analog keypad I experimented with consists of several buttons, each connected to a voltage divider circuit. When a button is pressed, the voltage value on the connected line changes, and this analog value can be measured by the microcontroller. By analyzing the measured voltage values, the microcontroller can determine which button has been pressed.
Components and Circuit Setup:
To create an analog keypad with four buttons, I required five 2-kilo ohm resistors, four push buttons, and one 500-kilo ohm resistor. The circuit is set up as follows:
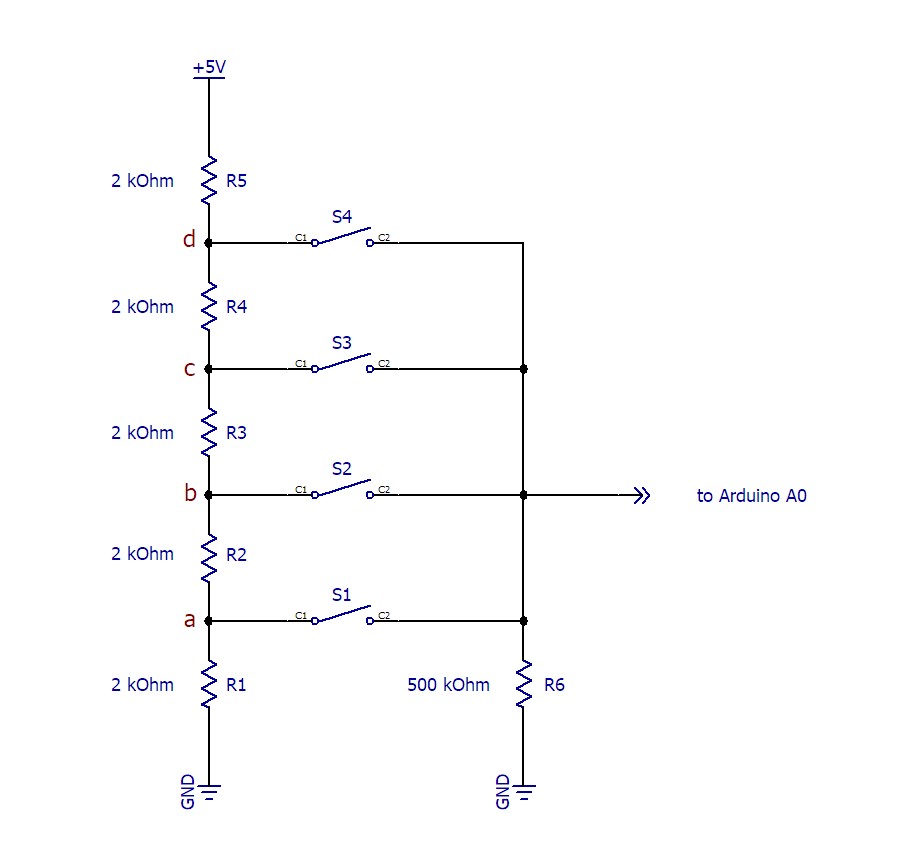
Five 2-kilo ohm resistors form a voltage divider circuit. One end of the resistor network is connected to the supply voltage, and the other end is to the ground. Each junction between the resistors is connected to a button, and the other side of the buttons is connected together as input for the analog port.
The 500-kilo ohm resistor is connected between the analog input port and the ground. This resistor prevents floating conditions on the analog port when no button is pressed.
Measuring Analog Values:
Using voltage divider calculations, I obtained voltage values for each button. The resulting values were 1V, 2V, 3V, and 4V for the respective buttons. When any button is pressed, the corresponding voltage is connected to the Analog Input port.
ADC Conversion:
Inside the microcontroller, the analog voltage values are converted into digital representations using the Analog-to-Digital Converter (ADC). The ATmega328P, for example, has a 10-bit ADC with a resolution that converts voltages between 0 and 5V into values ranging from 0 to 1023, or 204 per volt.
Compensating for Inaccuracies:
Due to noise, the 500-kilo ohm resistor, and resistor tolerances, the read voltage values may not be entirely accurate. To address this, I added tolerance values for ADC readings. For example, if the ADC reading falls between 194 and 214, or 204 with a tolerance of 10, it is identified as button 1, and similarly for other buttons.
Coding Implementation:
In the code, the variable “key” contains the number of the button pressed, which can be used to determine the necessary processes. For now, I send this “key” information to the serial communication for further use.
const int analogPin = A0; // Initialize pin A0 as analog input
const int tolerance = 10; // Tolerance for reading analog values (adjusted as needed)
const int numButtons = 4; // The number of buttons used
int buttonValues[] = {816, 612, 408, 204}; // Array for storing the corresponding push-on button analog values
void setup() {
Serial.begin(115200);
}
void loop() {
int analogValue = analogRead(analogPin); // Reads analog value from pin A0
int key = -1; // -1 indicates no button has been pressed
// Searches for the appropriate button based on the read analog value
for (int i = 0; i < numButtons; i++) {
if (abs(analogValue - buttonValues[i]) <= tolerance) {
key = i;
break;
}
}
// Sends results to Serial Monitor when the button is pressed
if (key != -1) {
Serial.print("Button : ");
Serial.print(key + 1); // Displays the pressed button number (starting from 1)
Serial.println(" pressed.");
}
delay(200); // Provides a slight delay so as not to read the button repeatedly quickly
}Conclusion:
Analog keypads provide an efficient solution for inputting multiple buttons using a single analog port on Arduino microcontrollers. By incorporating voltage dividers and ADC conversions, we can reliably detect which button is pressed. While there might be some inaccuracies, proper calibration and tolerance considerations can ensure a robust and functional analog keypad for various applications.